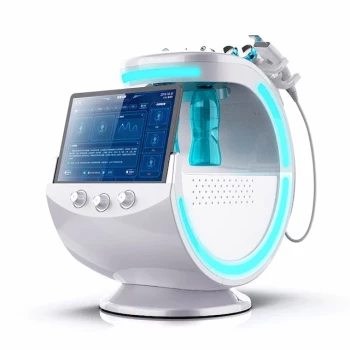
To operate the hydra dermabrasion function, you must manipulate the three specific control knobs located on the front of the machine's console. First, rotate the middle knob to select your desired solution bottle (A, B, C, or D). Once the solution is selected, use the left knob to regulate the water flow rate and the right knob to set the vacuum suction intensity.
Core Takeaway The effectiveness of the treatment relies on balancing solution delivery with vacuum pressure. You must coordinate the solution selection with the appropriate flow and suction settings to cleanse pores deeply without causing mechanical stress to the skin.
Configuring the Control Panel
Selecting the Solution
The machine utilizes a multi-tank system to deliver specific treatments. You must rotate the middle knob in front of the screen to toggle between the available solution bottles (A, B, C, or D).
This selection determines which specific serum or liquid is drawn into the handpiece for the procedure.
Adjusting Flow and Vacuum
Precision control is managed via the remaining two knobs. The left knob specifically adjusts the volume of water flow delivered to the tip.
The right knob controls the strength of the suction. This allows you to customize the vacuum pressure based on the client's skin type and tolerance.
The Protocol for Mode D
There is a critical operational requirement when using pure water for hydrogen and oxygen therapy.
If you select Mode D, you must wait exactly 3 minutes before beginning the treatment. This pause is necessary for the machine to properly decompose hydrogen and oxygen within the pure water.
Application Technique
Proper Probe Movement
To maximize efficacy and safety, you must vary your physical technique based on the facial zone.
When treating the nose area, apply the probe using a spiral motion to effectively target congested pores. For all other parts of the face, utilize an upward lifting motion to encourage drainage and skin tightening.
The Vacuum Mechanism
The handpiece functions by creating a vacuum seal against the skin. As you move the probe, it simultaneously sucks away dead skin cells and pore debris while injecting the selected solution.
Ensure the tip maintains contact with the skin to allow the vacuum to open pores and extract impurities effectively.
Understanding Operational Trade-offs
Suction vs. Skin Sensitivity
High suction power provides deeper extraction but increases the risk of bruising or irritation on sensitive skin.
You must constantly monitor the skin's reaction. It is safer to start with lower suction (right knob) and increase it gradually rather than starting at maximum intensity.
Flow Rate Management
Adjusting the water flow (left knob) is a balance between hydration and dripping.
Excessive flow can waste expensive serums and cause the handpiece to drip, breaking the vacuum seal. Insufficient flow may lead to a "dry drag," which feels rough and abrasive to the client.
Making the Right Choice for Your Goal
To ensure the best clinical outcome, align your settings with your specific treatment objective:
- If your primary focus is Hydrogen/Oxygen Therapy (Mode D): Ensure you budget for the mandatory 3-minute decomposition wait time before the probe touches the skin.
- If your primary focus is Extractions (Nose/T-Zone): Increase the suction (right knob) slightly and utilize the spiral motion technique to dislodge debris from tight pores.
- If your primary focus is Lymphatic Drainage: Lower the suction intensity and focus strictly on consistent, upward lifting motions across the cheeks and jawline.
Mastering these controls allows you to transform a standard cleaning procedure into a customized, high-performance skin therapy.
Summary Table:
| Operation Component | Control Mechanism | Key Function |
|---|---|---|
| Solution Selection | Middle Knob | Toggles between serum bottles (A, B, C, or D) |
| Water Flow Rate | Left Knob | Adjusts the volume of liquid delivery to the probe |
| Vacuum Suction | Right Knob | Sets extraction intensity based on skin sensitivity |
| H2/O2 Mode (D) | System Delay | Requires a 3-minute wait for gas decomposition |
| Nose Technique | Probe Motion | Uses spiral movements for pore extraction |
| Face Technique | Probe Motion | Uses upward lifting motions for drainage |
Elevate your clinic’s facial treatments with BELIS professional-grade medical aesthetic equipment. From our advanced Hydrafacial systems to Diode lasers and Pico technologies, we provide the precision tools premium salons need to deliver exceptional results. Enhance your service quality today—Contact our experts for a personalized consultation!
関連製品
- ハイドロフェイシャルマシン(顔用スキンアナライザー&スキンテスター付き)
- ハイドラフェイシャルマシン フェイシャルクリーン 顔とスキンケアマシン
- フェイシャルスキンアナライザー付きハイドラフェイシャルマシン
- 肌の引き締めのための4D 12D HIFUマシンデバイス
- クリニック用ダイオードレーザーSHRトライレーザー脱毛機